Friday, November 30, 2012

In My Kitchen


      I have been asked several times for my bread recipe and so I thought I would just share it here where everyone can find it! This is my very simple, everyday bread recipe- I feel comfortable knowing exactly what is in it- simple ingredients- no preservatives. I started baking bread soon after the Holidays last year and haven't looked back since.


  The Goods:

1/2 cup skim milk
3 tablespoons sugar
2 teaspoons salt (I leave this out)
3 tablespoons butter
2 packages active dry yeast
1 1/2 cups warm water
5-6 cup flour (I use half whole wheat)

The Deal:

Place milk, sugar, salt and butter in a small sauce pan. Heat over low heat until butter melts and sugar dissolves- cool down.

Meanwhile place 1 1/2 cups warm water in mixing bowl- dissolve a teaspoon of sugar and add yeast- let sit the duration of first step (until the yeast looks bubbly and foamy)

Combine yeast, butter & milk mixture together with 4 cups of flour- if you are using a mixer then mix for about a minute. If you are working by hand stir until all ingredients are combined- when you cant stir with a spoon any more get in there with your hands and mix until all ingredients are combined. At this point start adding in a half cup of flour  at a time and combining until the dough is not sticky. If you are using a mixer- mix about 2 minutes. If you are working by hand- it will take about 5 minutes. Dough will be slightly sticky to the touch- you may not need all 6 cups of flour.

With mixer- Knead dough for about 2 more minutes
By Hand- Knead dough for about 5 more minutes

Place dough in mixing bowl covered with a clean tea towel and let rise in a warm, draft free place for about an hour or until the dough has doubled in bulk.

Punch dough down and divide in half- form into a loaf "shape", place in a greased bread pan. Cover again. Let rise again for about an hour or until dough has doubled.

Bake at 400 degrees until golden brown- about 30 minutes. Remove from pans & let cool before devouring!


    Friends it is Friday once again! This weekend we will be fully immersing ourselves in the holiday spirit and decking the halls- egg nog anyone? I'm also looking forward to having coffee and a visit in person with my sister Saturday morning during Miss Lo's ballet class- a festive occasion if I ever heard! May your hearts be warm and your toes be frost bite free Friends- happy weekending!

Thursday, November 29, 2012

Making: Clay Tags


    We started today off with a nature walk- while we do manage to bring a fair amount of the natural world into our home every time we set foot out the door this was a special walk as we took the time to meander through the neighbourhoods,  observing and taking stock of the seasonal changes going on around us. It has been such a mild fall here that we were not surprised to find the West End Community Garden still teaming with produce as well as a handful of gardeners. Of course since we had our trusty collecting bags with us we felt inclined to bring a few specimens home!


     The second part of this adventure takes place at the hub of our home- our kitchen table- it's where we do everything- our table has a very good story written upon it's surface- evidence of a happy family I like to think! Once the last of lunch was cleared away we got to work- taking some of those items collected earlier in the day and parlaying them into inspiration for some handmade gifts.


    The instructions for this little project could not be easier- all you will need is some dry- hard clay- I'm not going to lie- we used Das Modelling clay because that is what we had on hand. If you feel the need to make your own dough from scratch there are plenty of very easy recipes (like this one here) floating around the interwebs right now- this seems to be a super popular project for crafty minded folks- Pinterest is blowing up with clay tags!


      Start by rolling out your dough or clay onto a flat surface- I put down parchment paper first for easy clean up. Next cut out shapes with cookie cutters or a simple glass juice glass- don't forget to poke a hole in the top of your tag from which to hang a string from- a straw is the best tool for this job as it will give you a nice clean cut out and all the excess clay will be stored inside the straw out of the way. 


      You may at this point be wondering what happened to our nature collection and how it is going to come into play. Well enter in the little leaves and other bits of natural items- place them gently on the surface of your tag and roll over top with a glass or as we did here a brayer- keeping the pressure light but even. The idea is to emboss the leaf ( or whatever) onto the surface of the tag with out squishing the tag flat.


    Once you have gently rolled over your tag a couple of times- preferably no more than two other wise it just gets messy- ease your leaf ( or twig or whatever) off the tag to reveal a beautiful impression left behind.  Of course I had to take things one step further and started to look around for other items to emboss into the clay- the lace and a doily worked really well and left a great imprint.


      After we had our fill of cutting out shapes and embossing I grabbed my mini alphabet stamps and added the Little's names as well as a few simple sayings onto the tags while they were still wet. Once we were satisfied with our work we placed everything out on baker's racks to dry over night. Tomorrow I will give the tags a light sanding around the edges and add some baker's twine through the holes.


      I keep hearing over and over the refrain that people just are "not into it" this year- referring of course to the Holidays and all the gift buying craziness that goes along with it. In our house I have found that the most special and magical part of the Holidays is the secret making of gifts reflecting our love for the people in our lives. Not a tonne of money spent- but the time and the thought that goes into each little package made with so much care- now that is magic!


P.S. these tags are not just for kids and grandparents- they would make a wonderful addition to a bottle of wine or jar of jam being given as a hostess gift!


Wednesday, November 28, 2012

Whats in Your Beauty Bag?


     Recently I broke up with a long time friend- this friend and I had been through thick and thin, many boys and every fashion trend imaginable. This friend had been my one constant, my go-to- until recently when I learned this friend was actually not so friendly. That little innocuous yellow tube with a bee on it that was always in my pocket- ready to be pulled out at any chance I might need soft kissable lips- so minty- so environmentally friendly- so recently bought out by a multi national corporation. Yes I broke it off with my chap stick.

    It's sad day but one I know I can not continue to ignore- I know it's time to have a show down with my beauty bag- Mano a Mano. I have been phasing out conventional beauty products* over the last few months - as I use something up it is being replaced with something more sustainable and locally made- I am greening my beauty bag. Recently I received a copy of the Winter 2012 issue of Eco Parent and within those pages I came across an article on conventional beauty products that would make any one's hair stand on end- or fall out- depending. Furthering my resolve to rid my beauty regime of all  the seemingly green Plant- based Chemicals as well as the obvious Petrochemicals- I don't use any of this stuff on my kids so why do I feel the need to eliminate wrinkles with petroleum?

    What is a girl to do? I reached back into the recesses of my brain trying to dig out some old recipes I used to use when I was broke in high school- you know before I was wealthy enough to slather myself in chemicals. I used to wash my hair with Apple Cider Vinegar- or once with Mayo- this did not work FYI. My favourite beauty recipe was by far an oatmeal based scrub that could also double as a bath soak- great for winter and cheap as chips!
   

The Goods:

1 cup oatmeal
1/2 cup corn meal
1/2 cup lavender or green tea leaves

The Deal:

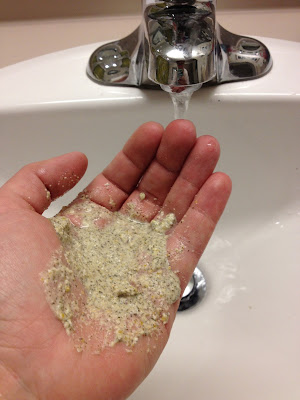
combine everything together in a food processor and give it a few whizzes until you get a fine powder- store in a jar- you are done- how easy was that?


To Use: simple shake a small portion out onto your hand and drizzle some water in- mix until you have a paste and use as you would any scrub on your face. The lavender is antibacterial so can help clear up blemishes, the green tea leaves are soothing for inflammation. To use in a bath place a few teaspoons inside a muslin bag and toss into your bath and relax - just like tea.  The oatmeal will help sooth itchy winter skin. Probably it is not a good idea to let this stuff go down the drain- but you can empty the contents into the compost- rise bag out to use again another day.


    I will admit that while I am willing to wash my face with oatmeal I am not ready to tackle making my own shampoo- I was so happy to come across this yummy little bar at our local Whole Foods- I was even more elated when I discovered it is made in my own hometown or Peachland! I can't wait to try it on my hair tonight. Of course I am still using my old favourite hand cream as well as their body bar now- from the folks at Sweet Earth Soapworks- the Uncle Willy's Old Style Lavender Hand Balm- absolutely my favourite beauty discovery this year- better than any conventional hand cream I have ever used!

    You might be wondering about my old friend the lip balm- who did I replace it with? Well I have tried several "natural" and even home made chap sticks but have finally found bliss in an all natural version from Jane's Honey- made by the same bees who make our honey! Local beeswax from local bees- how much closer to the natural can I get?

  *my use of the term conventional beauty products refers to any product manufactured for a corporation- any popular brand sold in stores- although in the past I have tried to use "natural" or products with "organic" components- these terms often mean little when combined with Petrochemicals

Tuesday, November 27, 2012

Holiday Chains and a Mini Give Away!

     Did you ever make paper chains when you were a kid? I sure did and our mom put them on the tree year after year even after they were beyond repair- I still have my first paper chain made in kindergarten inside my Christmas decorations box. I can only assume it is due to these fond memories that paper chain garland is one of my favourite holiday crafts.


  This is such a basic and relaxing project- the perfect way to unwind and warm up after a morning of school and an afternoon at the beach! To make this really a one step project we used pre-cut lengths of paper- I made them all the same so our project would have some uniformity- and all the Littles had to do was glue.

    Of course like everything we do we had to go big with this project- twelve meters big- perhaps a world record? We set out to make the biggest chain we could and in a couple of hours it was finished and ready to be hung up- luckily we have a long run of wall from the living room to the beds rooms that accommodates such footage of paper chain!


   I think this weekend my dress mannequin (pictured lurking in the bottom left hand of this photo) will go into storage and the Christmas Tree will come out. I do love this time of year so much and cant wait to share all the holiday elfing that is happening behind the scenes around here- I don't want to ruin any surprises!


       With Christmas songs filling my head I thought I would have a mini give away this week- a fun pack of Colour Me Postcards from Draw Me A Lion. I have talked about this awesome creative company here before- brought to you by Lisa Cinar- creator of all the fantastical creatures at Draw Me A Lion. Hands down her projects are some of our favourites- conveniently Draw Me A Lion has awesome colouring pages that fit neatly rolled up in a tube- perfect to fit into a boot for St. Nickolaus Day!


The Deal:  there are a couple of different ways to enter this give away- Comment on this post, sign up to Follow Weekdays- From- Scratch or Like Plain Jane Designs on Facebook- or do all three! If you sign up to Follow me or Like Plain Jane come back here to Comment that you have done so- at the end of this week I will draw for that pack of fun postcards!


Monday, November 26, 2012

Printmaking with the Littles


      Hello Friends! Here we are at the start of a bright, shiny week once again- I had such an over the top weekend filled with creativity, family, tutus, pancakes and fantastic friends that I am ready for this week! The main event for me was my stint as a visiting artist over at Opus Framing and Art Supplies- as promised I am going to share the three awesome projects I presented as well as my list of go- to art supplies that are in my arsenal.

        Since it tis the Season to get creative one of the projects I presented this weekend was very basic relief printing onto greeting cards- a subject near and dear to my own little heart. This is one of my favourite projects to do with the Littles if we need a birthday or Holiday card- it is shear magic as well as being very simple to do!

The Goods:

Scratch Foam Styrofoam sheets
regular pencil
brayer (the rolly thing with the handle)
rolling pin or empty wine bottle
Speedball water based printing ink
pallet (a piece of plexi will work)
smooth card stock


The Deal:

1)    Cut a sheet of Scratch Foam down to just slightly smaller than your card stock, using a regular pencil draw on your design.

*tip- if words are part of your design remember to draw/print them backwards- when they print they will print as you normally would read them*

2) Squeeze out a moderate amount on ink onto a smooth washable surface like a painting pallet or piece of plexi glass- roll out the ink evenly until it has the texture of an orange peel and the brayer is evenly coated- you do not want think goopy ink.


3) Taking your brayer, which is evenly coated in ink, carefully roll it over the surface of your drawing on the Scratch Foam- again trying to keep the distribution of ink even.


4) Once the drawing is evenly inked up place a card on top- try to get it centered but don't fuss too much about it- place a cover sheet of plain paper over top (this is just to keep things clean)

5) Press everything in place- the sticky ink should prevent your card from sliding around) and roll over top with the rolling pin or bottle exerting even pressure as you go over everything a few times.


P.s. please excuse the action shot- Miss Lo was really getting into her work!


6) Peal off the original sheet of foam and set your card aside to dry- ink it up again for multiple cards- you should be able to get at least six from one drawing!


7) Finish off your Masterpiece with some embellishment or stamped greeting- instant Holiday keepsake!

       
          I had a great time sharing my passion with a handful of equally interested folks- thank you to Andrea, Brendan and the rest of the lovely staff who helped me set up and feel at home. I so enjoyed teaching a group of people again- I realised midway through just how much I have missed this part of my life. Thank you as well to Lovely Cousin Laura who took a couple of snaps while I was doing my thing!


Because I know people will ask: all these supplies can be purchased through your local art supply store. Here in British Columbia Opus Framing and Art Supplies has five brick and mortar stores- click link for locations- I know from personal experience that staff at all locations should be able to point you in the direction of all items used here. Opus also has a mail order service all across Canada. If you are in the United States try Pearl Paints or Blick Art Supplies- most products or similar will be carried.


Friday, November 23, 2012

Demo Prep

   I have a Demo coming up this weekend- Demonstration for those of you in need of translation- my demo is all about art projects for kids- of course! I am really excited and slightly nervous as I haven't stood in front of a crowd- much less a voluntary crowd who are there to learn- in about seven months. The old nerves are kicking in as are the old toxic thoughts- what if no one shows up? What if I lose my voice? What if I have a know- it- all heckler? All these things have happened in the past- the worst was when no one showed up- it's a bit like throwing a party with no guests!


  Deep down I know I am being silly and insecure. I know I can handle anything that comes my way- including laryngitis- been there done a demo with that! I know that I will be there and give my best performance and if no one shows well then their loss! Deep breath- positive thoughts and a great outfit are the best remedy!


   With those positive thoughts running through my head I worked a bit on my preparation for the big day- which is this Saturday incidentally- yup it's close!  I had a bit of help in the form of two eager Littles who haven't gotten a lick of painting in all week! (Not that I recommend licking any paint- ever)

 
 I am really excited about the three projects I have prepared to help parents get their kiddos to take their art to the next level- beyond the crayons and paper. A common thread that I have heard time and time again from my friends who are parents is that they have the willingness to do art with their children they just don't really know what to do. Often books are intimidating and expensive - really nothing is better than seeing something happen live to help it sink in and get a person all jazzed up!


   I know that not everyone can or wants to give their kids great quality supplies to work with- often people relegate the crummiest of paints to children- and that is OK. What I would encourage every parent to do is buy the best quality that they feel comfortable with- I really like Yarka watercolours and we use them quite a bit- really reasonably priced and due to the higher pigment content the colours go farther which means they last longer than many cheaper brands. When given the proper tools a child will gain grater confidence in their own abilities.

   Another item that I frequently splurge on now that our Littles are a bit older is some decent quality watercolour paper. For a couple of dollars a sheet you can get at least six good sized paintings (or one really big one!), the great thing about using actual water colour paper is that it is designed to stand up to lots of water- so let the kiddos loose, step back and let the magic happen!


    Even if you can't make it down to Opus Framing and Art Supplies this weekend I hope that you will still get excited and break out the old watercolours with your kiddos this weekend- what better way to spend a rainy Saturday or Sunday afternoon? Maybe make some holiday cards or gifts for Grandma & Grandpa- Grandparents eat this stuff up- you will be a hero!


    If you are local with some free time this weekend- my demo is at the Downtown Vancouver location of Opus Framing and Art Supplies- right at the corner of Cambi and Hastings- the demo starts at 2pm and will go to at least 4pm. Feel free to come down and pick my brain- or whats left or it anyways! Aside from my all encompassing- life- altering- demo there is a strong possibility that you can find me wandering the Farmer's Market with a coffee in hand early on Saturday- this week I am going to try and get a pint of Ernest Ice Cream and I must get there before it is all sold out! Or kicking back with some girlfriends and mimosas on Sunday- destination yet to be determined! I hope you have a super weekend friends- may your feet be dry and your heart be warm!